How to plan your curriculum using block and core. This article is intended for Admin. (Read time: 5 minutes)
Last updated: 14/07/2022
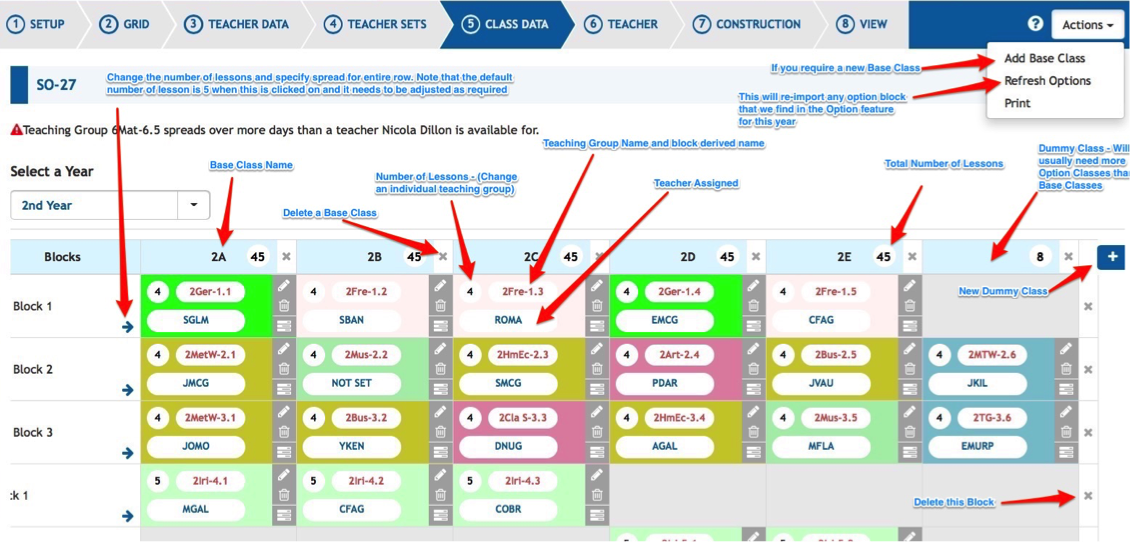
 Class data is very important as you will specify how you want your curriculum to be timetabled in this screen. The top part of the screen displays the “Blocks” in each year group and the lower part of this screen shows the ‘Core”.
Blocks
Blocks are an arrangement of teaching groups which run concurrently (i.e. any teaching groups within the same block will be scheduled at the same time). These are arranged horizontally across the screen in the Blocks section.
The base classes are arranged in vertical columns.
In addition, you may see what we refer to as a ‘Dummy Class(es)’. These are required when practical subjects in Option Blocks have less students than the number of students assigned to base classes, therefore you require an additional class to be created.
Normally, three base classes (with thirty students in each) would require four or five groupings for Option Block classes as these will have only 24 students or less in each. If the number of Base Classes and Dummy Classes exceeds six, a filter will appear allowing you to select only the class or classes you wish to view.
Example of Blocks:
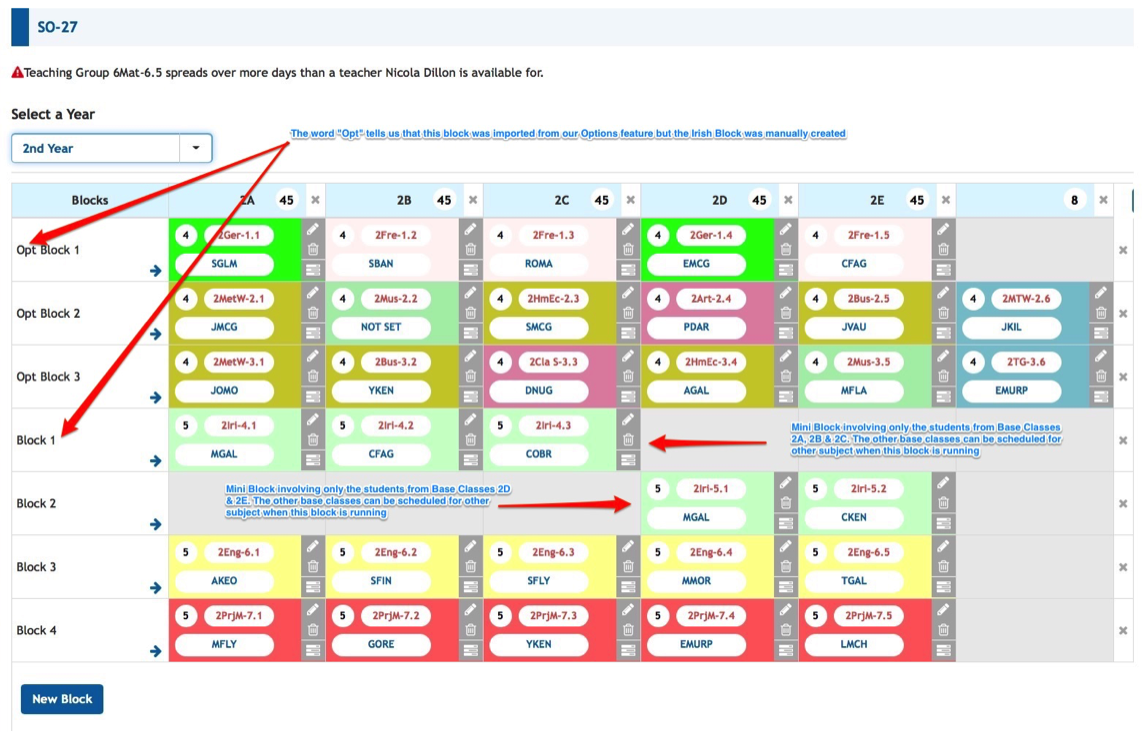
Above, you will see that there are three Option Blocks (i.e. Student or Subject options) imported from our Options feature (Opt Blocks 1,2 & 3). So for example, all five of the Teaching Groups in Opt Block 1 will run concurrently. (In this case, it is a language line with three French and Two Germans classes.
You will also see that we have one block of Maths and 1 Block of English. This will allow all of the students in year 2 to attend any of those English and Maths lessons. However in Irish, we have two ‘mini-blocks’. One of these (Block 1) will allow only the students from Base Classes 2A, 2B and 2C to attend. The remaining students in classes 2D and 2E can be scheduled for any other subject from their core section at that time. Similarly, the student in Base Classes 2D & 2E will have Irish at the same time allowing them to move between these two classes.
Core
Core is an arrangement of teaching groups which do not run concurrently (i.e. classes will be timetabled completely independently of the other classes). These are arranged horizontally across the screen in the Core section. Core in this screen means the subjects being taken by each base class.
The base classes are also arranged in vertical columns here.
Example of Core:
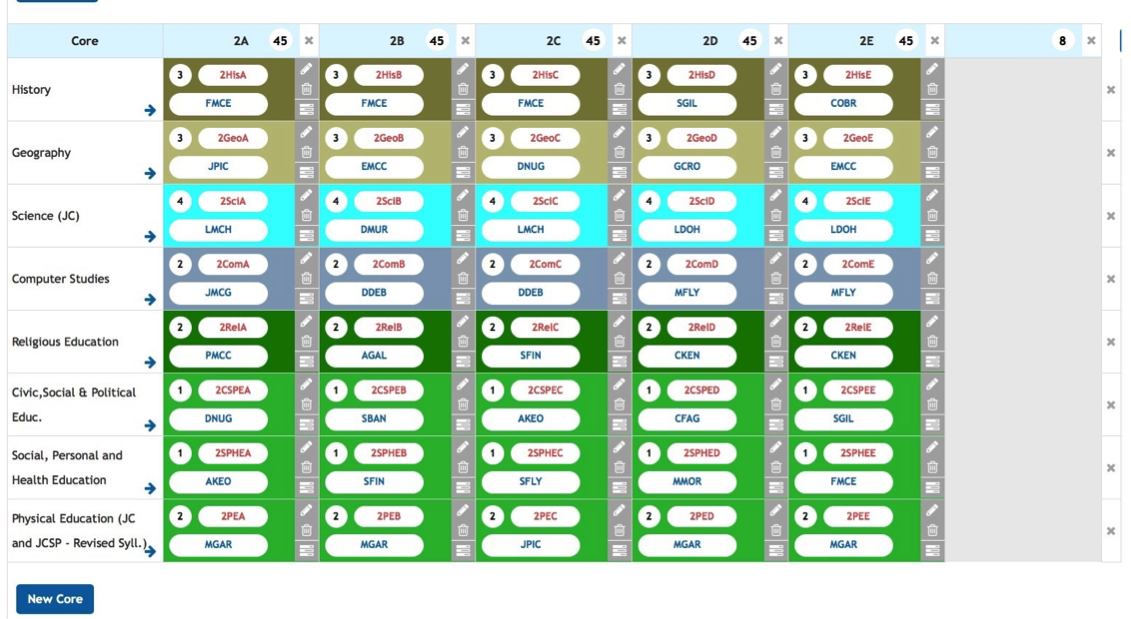 In the image above, you will see that each of the base classes 2A, 2B, 2C, 2D, 2E will study each of the eight subjects listed. All of these classes will run completely independently of each other (because they are in Core). It is possible that they could have the same subject at the same time, but if this happens it will be purely by chance.
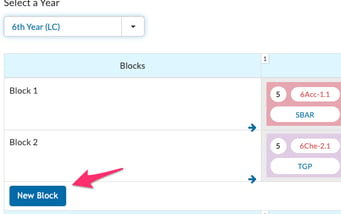
Step 1 - Creating a new block
To create a new block, simply click ‘New Block’ and the blank block will be created.
Step 2 - Creating a new core subject
To create a new core/add a new core subject, click ‘New Cores’. 
Specify the subject, number of lessons, class size, class spread (1,1,1,1,1 means five lessons should be single lessons spread over five days, more on this later).
Finally if you tick the 'Apply to all Teaching groups' box, it will create a teaching group for each of the base classes and each teaching group will have the same lesson number, spread and class size.
Click 'Save'.
Step 3 - editing and viewing the teaching group
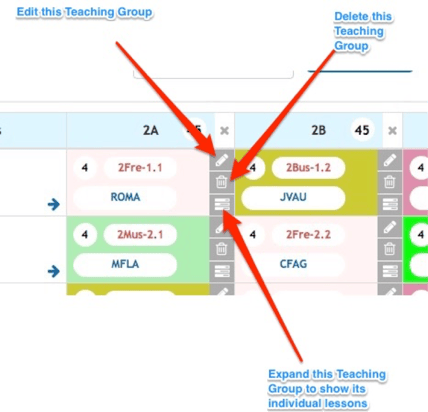
To edit a teaching group click on the edit pencil.
To delete it, click on the Delete button
To expand the teaching group to show it's individual lessons, click the expand the teaching group button.
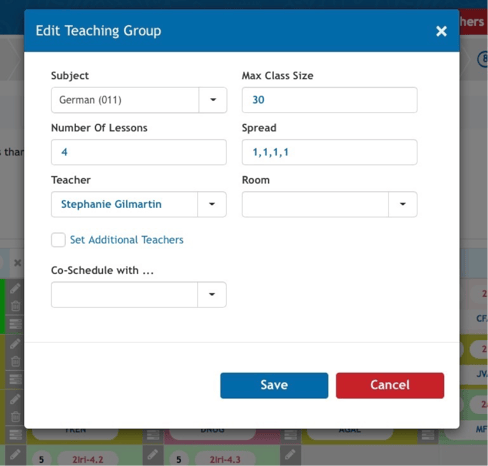
The edit pen button will allow you to:
- Assign or modify a previously assigned teacher
- Change the Subject to another Subject
- Add the Class Size (defaults to 30) if some of your rooms have limited capacity
- Set the Number of Lessons
- Set how these lesson are to be scheduled (Spread)
- (1,1,1,1,1 means five lessons should be single lessons spread over five days)
- (2,1,1,1 means the five lessons should have one double lesson and three single lessons)
- (2,2,1 means you require two double lessons and one single class)
- (3,2 means a treble lesson and a double lesson)
- (Blank means that you do not mind what the spread will be. The numbers in the spread cannot be greater than the number of lessons in total)
- Specify a required room
-
You can also add an additional teacher (TEAM TEACHING) to ALL of these lessons in this teaching group by clicking on the ‘Set Additional Teachers’ box and selecting the teacher you wish to add.
- Sometimes, you might require that a class from two separate years should be Co-Scheduled. The ‘Co-Schedule with…’ dropdown list box will allow you to select a teaching group from other years.
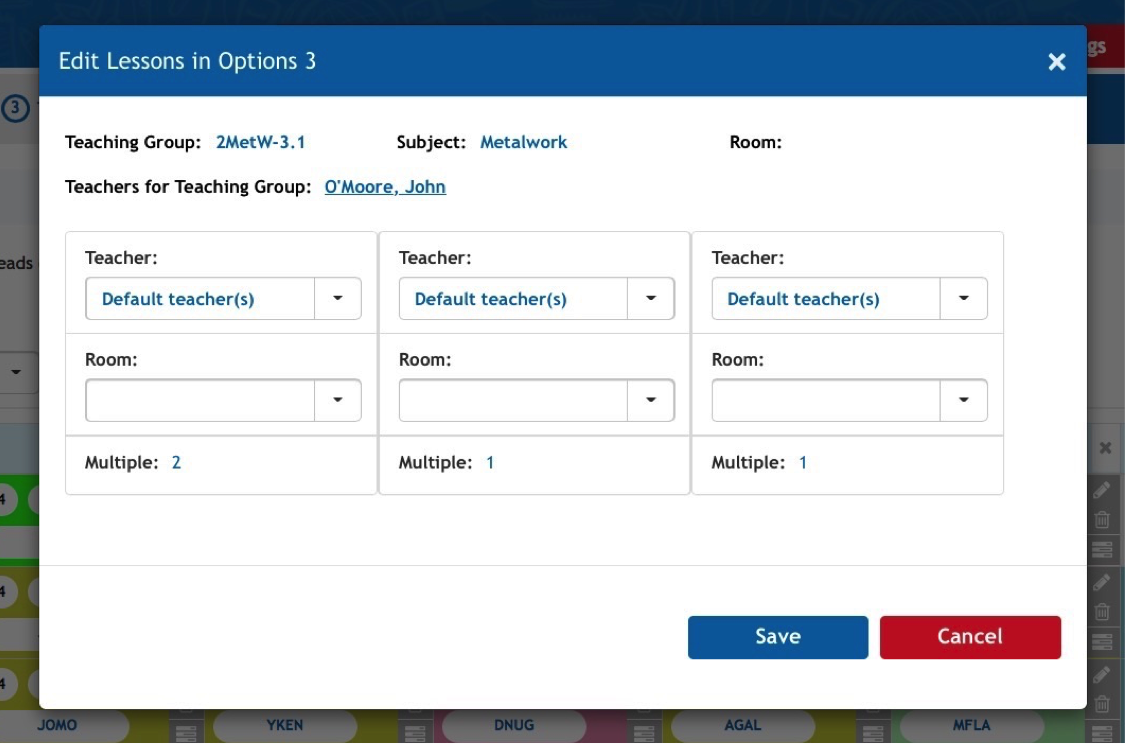
Clicking on the ‘Expand Teaching Group’ button will allow you to:
- Change the Teacher for any of the lessons
- Add an additional teacher for any of the lessons. To do this, you must change the default teacher to show the main teacher for the lesson and then the additional teacher option box will appear
- You can specify rooms to be used for specific lessons only. (This can be useful to manage a scare room’s usage. You might specify that a double lesson requires the room but not the single lessons)
Fore more detailed information on spreads, click here.
For more information on rooming your timetable click here, and for what order you should carry out the rooming of your timetable, click here.
Step 4 - Tracking the number of lessons
While working on this screen, it is important to keep a track of the total number of lessons you are creating to make sure you are not scheduling more or less than you should.
A tally of the lessons for each base class (that takes into account block and core) is seen at the top of each column. This number should match the number of available slots on the grid.
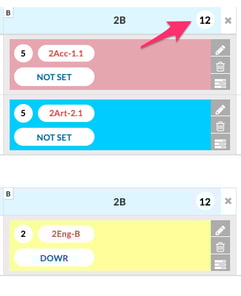
If this number is less than the number of slots on the grid, then students will have free periods during the day.
If you have a number of lessons greater than the number of places on the grid, the header for that class will turn red and this means that all of the lessons can not possibly be scheduled, as there are not enough slots on the grid.
With regards dummy classes: If a class is entered in the dummy class column of this screen, students from any base class with an entry in that row are free to attend this class also. Therefore, it is important that the number of lessons in the dummy class column is never greater than the number of lessons for each of the entries across that same row.
Video explainer - How to add a learning support class in Class data
Video explainer - how to move Core classes to a Block in class data
Video explainer - How to move core classes to split or mini blocks in class data
How to add Learning Support Classes
How to move Core classes to a Block
How to move Core classes to Split or Mini Blocks
If you still have questions, please visit our knowledge base at support.vsware.ie. You can contact our support team via email at support@vsware.ie, via the chat bubble when you are logged into your VSware account or via phone on 01-5549628. Support hours are Mon - Fri, 08:30 - 18:00.