We’ve recently updated our top menu navigation (July/August 2024). We’re currently updating our user guides to reflect these changes, so thank you for your patience while we work on this. The new menu is user-friendly, so you shouldn’t experience significant disruption. If you need help locating specific items in the new menu however, watch our quick videos for admin users here, and for teachers here.
This screen allows you to set the number of preferences that you are going to accept from each student. You then set the number of Option Blocks that you wish to generate and it is this number of subjects that the student will study.
The subjects that you wish to be included as preferences are also added on this screen. Subjects can easily be added or removed as necessary. If a subject is subsequently removed after it has been selected by a student, a blank space will appear in the preferences of those students and they can then select another subject instead.
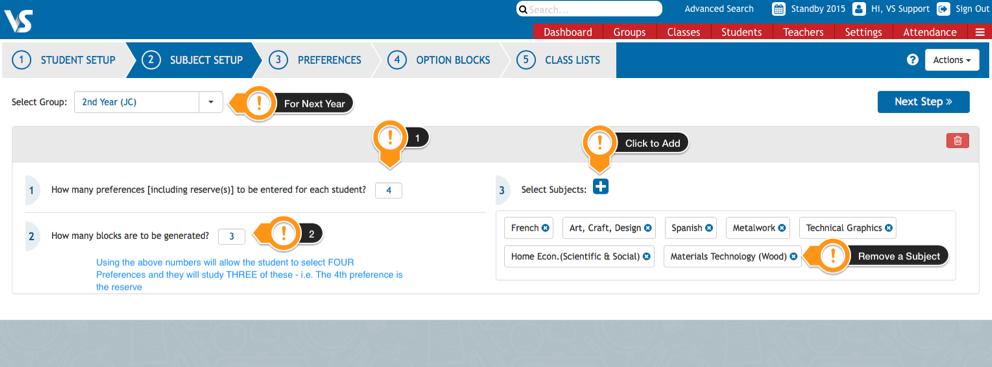
In the screenshot above, the students are being asked to select 4 preferences and they will study 3 of these subjects. All of the subjects are in one pool (or set) of subjects and this subject setup usually produces a high student satisfaction rate. Before generating option blocks using this method, it is important that students are well advised in their subject selection or some students could study an unbalanced curriculum.
Adding an additional Subject Set or Pool
If required, you can create an additional set of subjects by clicking on the Actions button and then clicking on ‘Create New Subject Set’. This can be used to create a language line or perhaps a set of Science subjects to ensure that each student will study a science subject and a language. Some schools do this to ensure that their student will have a balance curriculum.
The disadvantage of this method is that you are most likely to have a lower student satisfaction and in some cases, the shortage of specialised rooms could become an issue as similar subjects are on at the same time. This will be discussed in more detail in a later article in this category called Complex Subject Setup
