How to enter junior cert results via bulk upload. This article is intended for Admin. (Read time: 5 minutes).
We’ve recently updated our top menu navigation (July 2024). We’re currently updating our user guides to reflect these changes, so thank you for your patience while we work on this. The new menu is user-friendly, so you shouldn’t experience significant disruption. If you need help locating specific items in the new menu however, watch our quick videos for admin users here, and for teachers here.
Last updated: 20/02/2024
You now have the convenient option to upload the Junior Certificate results to VSware automatically from a CSV file, all at once. This new feature is designed to save valuable time for administration staff, eliminating the need for manual entry of results for each student. The option to manually enter results is still there however for those who wish to use it.
Before uploading the file to VSware, please be aware that some minor adjustments will need to be made. The process is explained in detail below.
Uploading Junior Cert results in bulk using a CSV file
⚠️ Housekeeping to carry out before you upload results ⚠️
- Uploading Junior Cert results will only work if the school has student exam numbers stored in the Exam Number field on a student’s profile on VSware. If there is no exam number stored in that field, then no data will get uploaded for the student.
- The exam number must be stored in the original exam number field. We are aware that some schools have created custom fields on a student’s profile and might have called them something like JC Exam Number and LC Exam Number. The system will not recognise these custom fields, so you will need to ensure that the original field contains the exam number.
- It is advised that you tidy up the subject data where possible to make sure the students are listed as studying the correct subjects. e.g. on a student’s Classes & Groups tab on VSware, sometimes the subjects from PPOD aren’t the same as the subjects the student is down to do on VSware. This may result in a subject being listed for a student in the CSV file upload but that subject cannot be found for the student on VSware.
Step 1
- Must be in CSV format
- File must be less than 100KB
- Must contain the following column headers: CANDIDATE_ID, SUBJECT_CODE, SUBJECT_DESC, LEVEL_DESC, LEVEL and GRADE
To edit the file the Department sent, follow these steps:
- The CSV file you download from the department will look something like the image below.
- To edit it, you must delete the first row altogether (the one with the red line below that contains your school roll number). This will make the row with the column headers, row number 1.

- You will also need to edit the column headers (the ones highlighted in blue) as follows. They must be exactly as written and in capital letters:
| Candidate_Number | changes to >> | CANDIDATE_ID |
| Subject_Code | changes to >> | SUBJECT_CODE |
| Subject_Desc | changes to >> | SUBJECT_DESC |
| Level_Desc | changes to >> | LEVEL_DESC |
| Level | changes to >> | LEVEL |
| Grade | changes to >> | GRADE |
- Your new file should now look like the image below:

Step 2
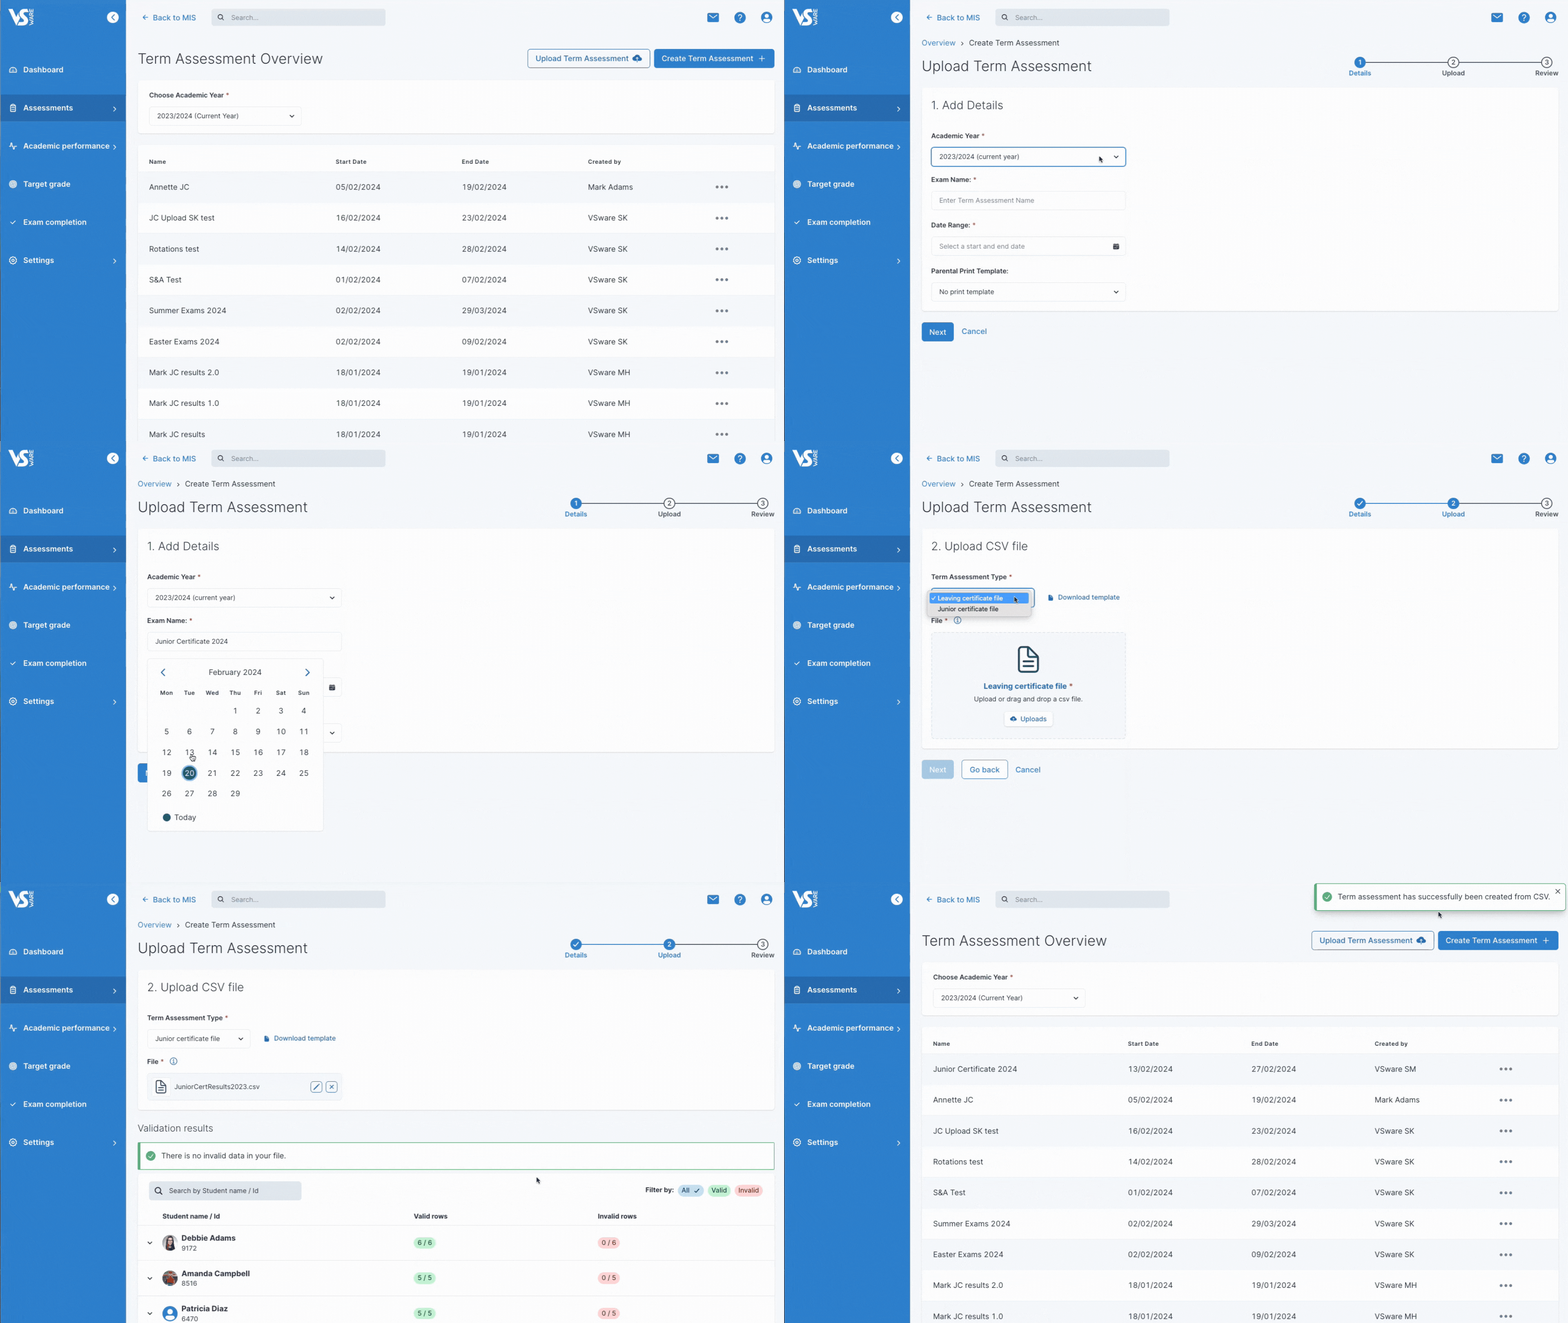
Now that your file is ready, go to Assessments > Term Assessments > Upload Term Assessment

Step 3
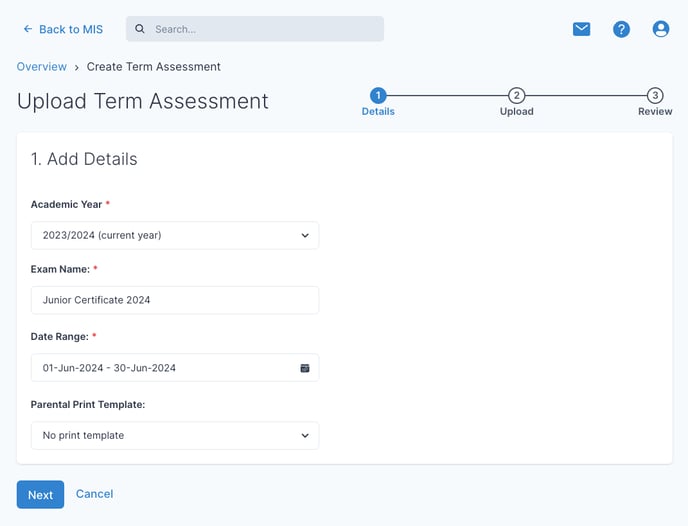
Fill in the relevant details > click Next
- Academic year - This should be the year the Junior Certificate took place.
- Exam Name - This should read something like 'Junior Certificate 2024'
- Date Range for Term Assessment - These are the dates that the assessment is open for editing. After the end date passes, you can no longer edit results or details. However, you can always go back and open up the dates to allow editing if needed.
- Parental Print Template - This is optional, if you want parents to be able to download a term report for the Junior Cert using one of your customised templates, then select the template here.
Step 4
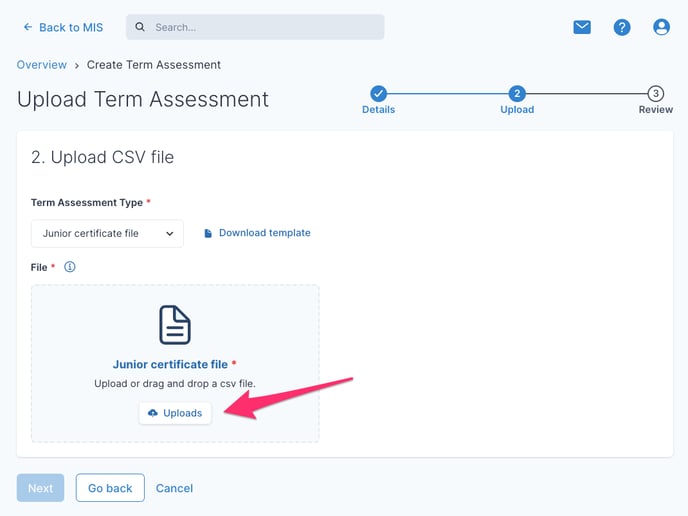
For the Term Assessment Type select 'Junior certificate file' from the dropdown > click 'Upload' > select the file from your computer.
Step 5
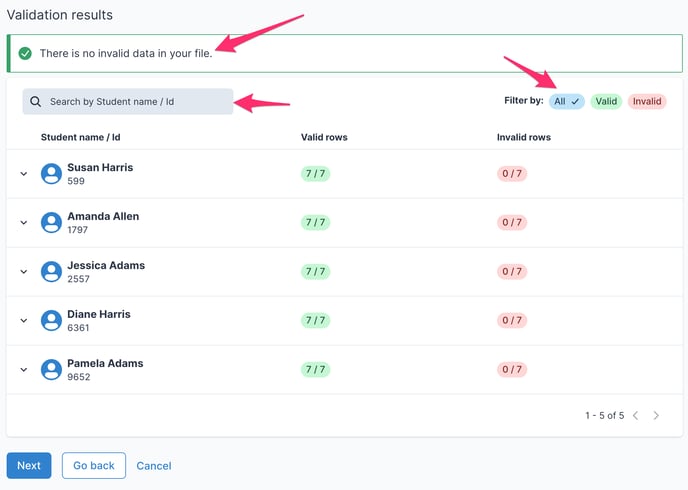
Next, check the Validation results.
Once you upload the file, an automatic check will take place to ensure your file meets the requirements. If there are any issues with the data in the file, a warning will appear indicating the issue, and request that you make the relevant adjustments and re-upload the file.
In the list of students, click into each name for a breakdown of the results that will be uploaded for them. Even if there are errors, you can still decide to proceed and make changes later.
You can also search by student name or ID, or filter according to the valid or invalid results on this page.
The example below shows that there were no errors with the uploaded file.
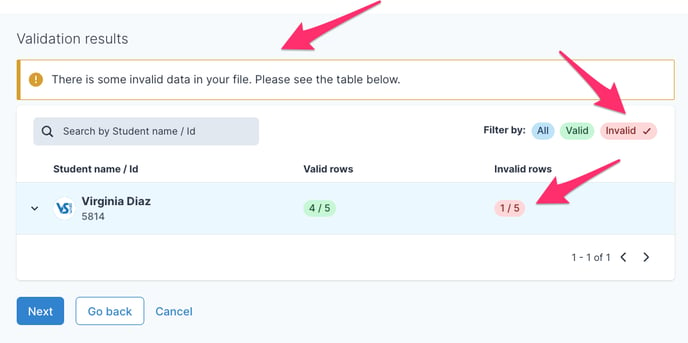
If an error message appears indicating "Invalid data found in your file. Please refer to the table below," you can easily identify and address these errors by clicking on the 'invalid' box on the right. By selecting each student's name, you can pinpoint the specific error.
The example below indicates that there are some errors with the uploaded file.
List of possible errors and solutions.
This row is duplicated and will be ignored - You don't need to do anything in this case.
The grade supplied is invalid - When uploading Junior Certificate results you can only use the latest Junior Certificate grades. E.g. C2 is not a valid Junior Certificate grade so it will not be included in the upload unless you amend the file.
Subject code does not exist - On Vsware within Settings > Subjects > You have a list of subjects that contain a subject code. Either amend your file to the correct subject code, or enter the correct subject code into your subjects list in VSware and re-upload.
We could not find a student with this exam number - Either amend your file to the correct exam number or enter the correct exam number for the student in VSware and re-upload.
Student is not a member of a teaching group for this subject - You can add the student to the relevant teaching group in VSware, amend the file or proceed without change.
The file type must be a CSV - Only CSV files can be uploaded.
Your file is empty or you have no headings in the first row. Please download the file template and follow the required headers and format and re-upload - When uploading a CSV file, your file must have data in it and contain the correct column headers. You must amend your file and re-upload.
File headers do not match selected file types - If the wrong headers are used in the CSV file. You must amend your file and re-upload.
Step 6
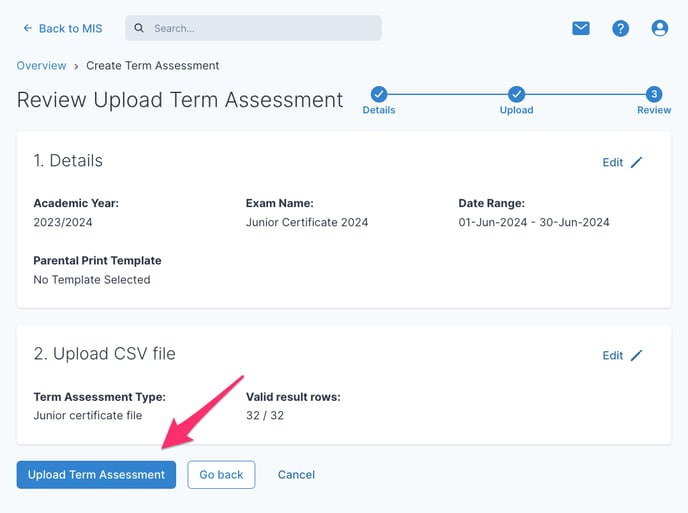
Click 'Next' > in the following screen, review the assessment.
Click 'Upload Term Assessment' > All results for all students will be uploaded to VSware together.
Step 7
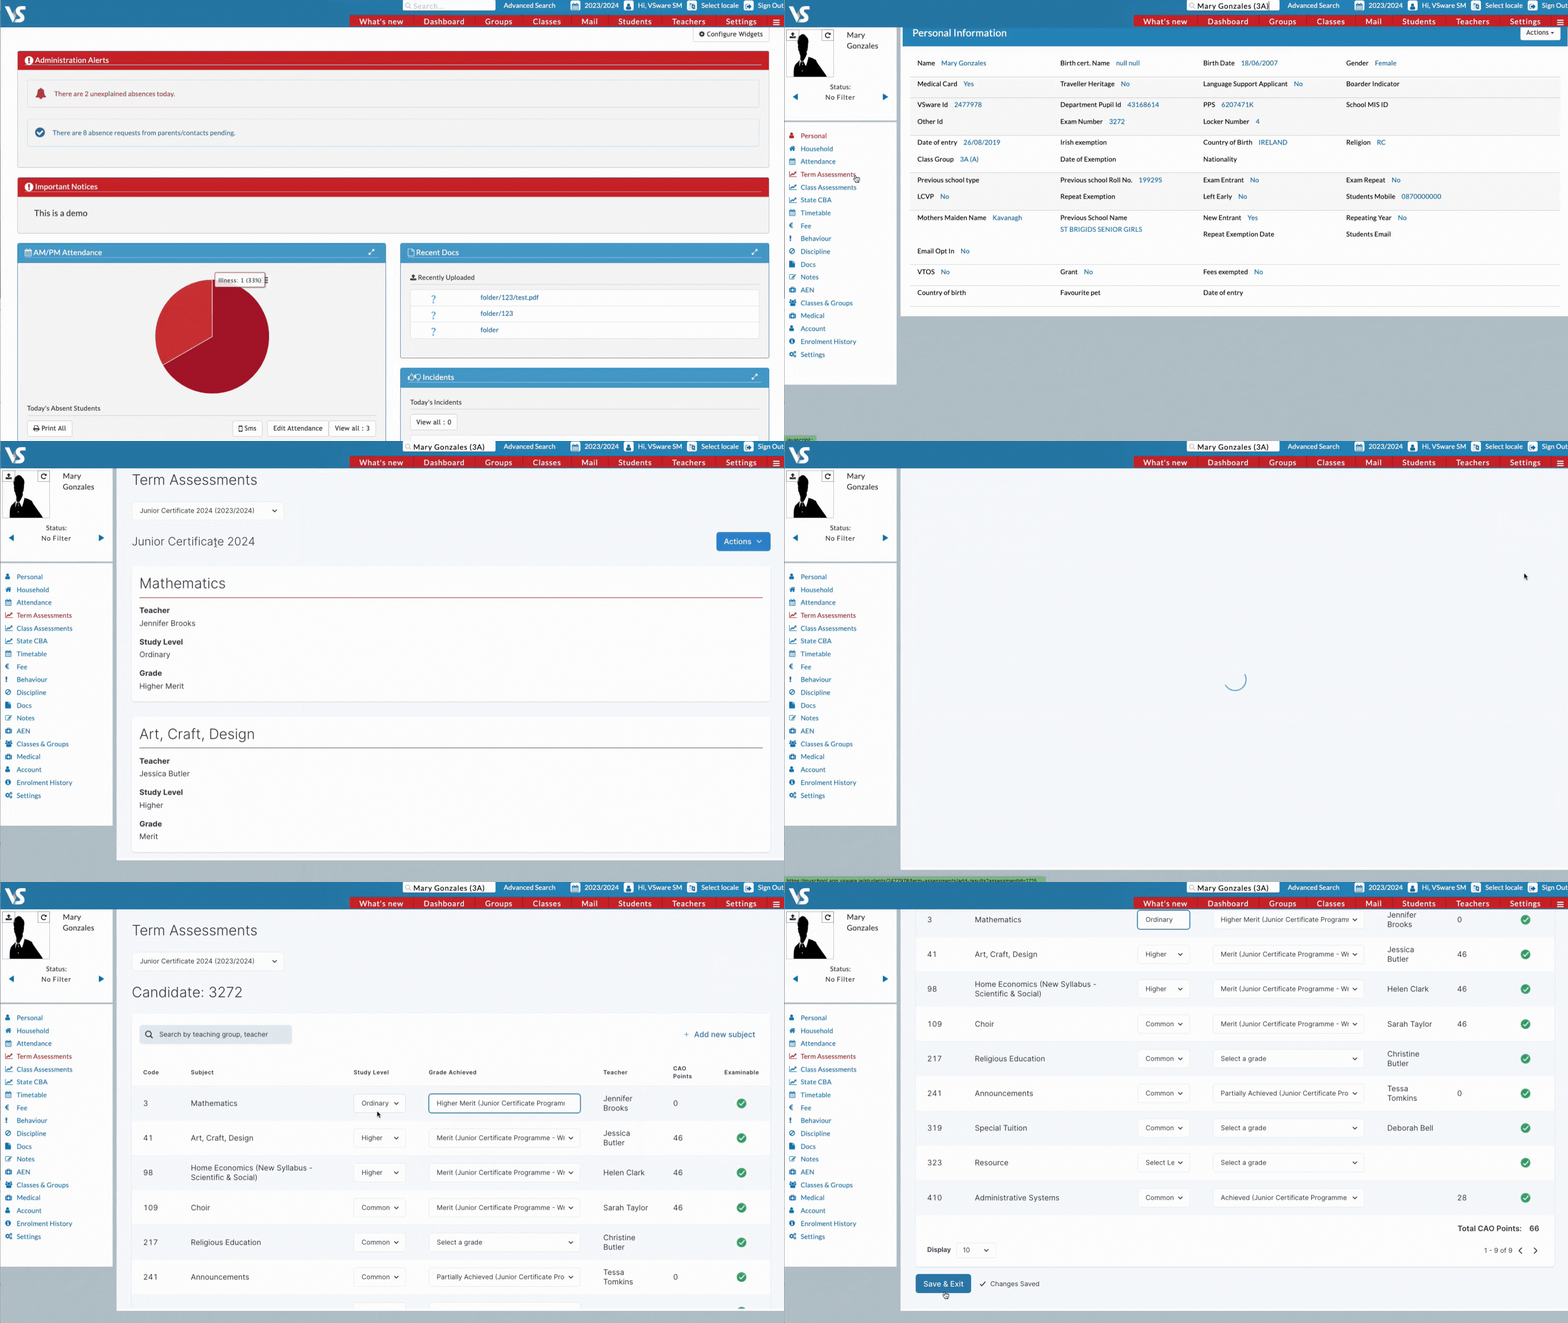
To check the results after the upload, simply search for one of the students on the list > select 'Term Reports', and select the assessment name.
If you need to make edits after you have uploaded the file, you can do this as long as the date range is still open.
If you have passed the date range, go to Assessments > Term Assessments > select the Junior Cert Exam > Edit > Change the dates to include today's date.
You can then go to the individual student's term report page > select 'Actions' > 'Results Entry'. Make the relevant edit > 'Save'.
__________________________________________________________________
If you still have questions, please visit our knowledge base at support.vsware.ie. You can contact our support team via email at support@vsware.ie, via the chat bubble when you are logged into your VSware account or via phone on 01-5549628. Support hours are Mon - Fri, 08:30 - 18:00.

