How to set up an exam and term report in line with the new NCCA criteria. Download & use our ready-made template.
We’ve recently updated our top menu navigation (July/August 2024). We’re currently updating our user guides to reflect these changes, so thank you for your patience while we work on this. The new menu is user-friendly, so you shouldn’t experience significant disruption. If you need help locating specific items in the new menu however, watch our quick videos for admin users here, and for teachers here.
The NCCA has released specific recommendations on how schools should be recording the predicted Junior Certificate results and Classroom Based Assessments for this year's 3rd year students.
For schools, this means simply setting up a new exam and entering the results, however to help schools get this done quickly and easily, we have included the following in this guide:
A) An outline of the NCCA criteria
B) How to set up the exam according to these criteria
C) How to enter the results and the 'Other Aspects of Achievement' comment
D) A ready-made term report template which is ready to be downloaded so you can add your own school details & re-uploaded to your VSware site to be used with the exam.
Click HERE if you want to download the term report template straight away.
A) NCCA Criteria

B) Setting up the exam
The exam is set up in the same way as any other with just a few modifications. Here is an example of what the headings might look like:
| Subject | Level | Grade | CBA 1 | CBA 2 | Teacher Comment | Teacher |
There is also a field for an overall comment labelled: 'Other Aspects of Achievement' which is captured using the principal or year head comment field'. Note: you must decide who will be entering this overall comment prior to releasing this exam for results entry so that the variable in your term report template is able to pull in information from that field.
- Go to Settings > Exams > Actions > New Exam.
- Assign 3rd years only to this exam.
- Enter the name of the exam, for example: 'Junior Certificate 2020'.
- Assign a start and end date, relating to when the exam will be open for results entry.
- Next, add your extra fields to capture the CBA results by selecting the 'Add Field' button.
- Type 'CBA 1' into the 'Field Name' box.
- Under 'Type' choose 'Select'.
- Here we want to add the pre-defined descriptors for Classroom Based Assessments. Under 'Value' type the descriptors and make sure to separate them by a comma, with no spaces. I.e.: Exceptional,Above expectations,In line with expectations,Yet to meet expectations
- Repeat from step 2 to create another new field called 'CBA 2' with the same descriptors.
- In order to capture the 'Other Aspects of Achievement' comment, you must enable either the 'Capture Yearhead Comment' or 'Capture Principal Comment' by ticking the relevant box beside it. For this particular report, it can only be one or the other, not both.
- Leave other fields as they are and do not tick the 'Capture Target Grade/Mark' box.
- Click 'Save'. Your exam is now set up, and depending on the dates specified, ready for results to be entered.
C) How to enter the results
The following steps can be carried out by the teacher.
- Go to 'My Profile' > 'Classes and Subjects' > select the relevant Teaching Group (or search for the teaching group).
- From this class list page, select the exam button 'Junior Certificate 2020'

In the exam entry page, enter the following:
- Level: Select appropriate level from the dropdown (you should not select N/A
- Grade/Mark: You input the mark as a percentage (Do not include symbol %)
- Grade: Will automatically populate if you enter a percentage mark.
- CBA1: Enter the CBA 1 results by clicking into the dropdown. Note that not all subjects will have a CBA result, so you can skip this step in those cases
- CBA2: Same as above
- Enter the teacher comment if applicable.
- Scroll down to the next student and repeat.
- This page automatically saves results and comments entered every 7 seconds, however there is also a save button at the bottom of the screen. Each comment has a save status which confirms if the result and comment has been saved successfully.

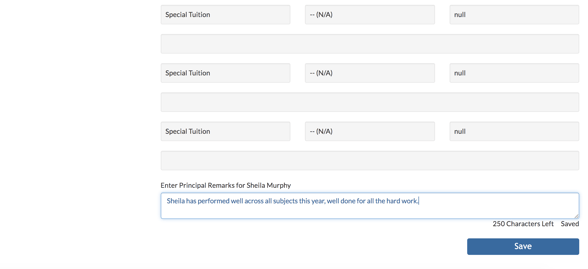
Entering the 'Other Aspects of Achievement' comment.
During exam set up, you decided who would be entering the 'Other Aspects of Achievement' overall comment. This can be entered as a Principal, Year Head or Tutor comment.
NOTE: The default template in this guide includes the tutor comment variable, you will need to amend this if you wish to use a different comment type. The variable for principal is ${Exam.PrincipalComment} and year head is ${Exam.YearHeadComment}
- Go to the 'Classes' tab
- Select 'View List' for one of the 3rd Year base classes
- Select the relevant exam tab on the top (P for Principal, YH for Year Head or just the exam name for tutor)

- Select the student and scroll to the bottom of the page.
- Enter the comment.
- Hit 'Save'.

D) Use our ready-made term report template.
- Click HERE to download our term report to your computer.
- Edit the details (school name, address, crest, contact details et.) and save the updated file to your computer.
- Go to Settings > Exam Print Template > Actions > Add File.
This term report is now ready to be used in conjunction with your newly set up exam.
