- Help Center
- Subject Options
- Generating Subject Option Blocks
-
Frequently Asked Questions
-
Teacher User Guides
-
Assessments
-
Timetabling
-
P-POD
-
Guides for Parents
-
Guides for Students
-
School's guide to Parent Accounts
-
Permission Slips (Communications Package)
-
VS-Mail (Communications Package)
-
Student Profiles
-
Attendance
-
Passwords and Security
-
Principal and Secretary Profiles
-
Teacher Profiles
-
Groups
-
Behaviour
-
Book & Supply Hub
-
Classes
-
Classroom Based Assessment
-
DTR Returns - September Returns & Subject Codes
-
Fees
-
Mailing Labels
-
Settings
-
SMS
-
Supervision & Substitution
-
Subject Options
-
QQI
-
Office365
-
User Hub
-
Unpublished, temp folder
-
Exams
-
AEN and Medical
-
Student Care Monitor (Student Alerts)
Step 1) Student Setup (read time 1 minute)
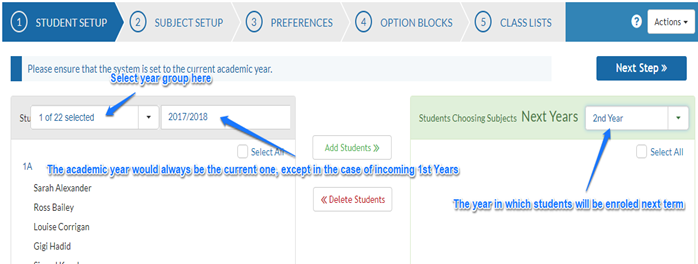
On this screen, you select which students will be providing subject preferences. On the left, select the current year that the students are in and on the right, the year that they are due to move into for the next academic year.
Please note that if you wish to set up preferences for incoming first years, select the next academic year on the left, and then next year’s 1st years on the right. (See screenshot).

By ticking the Select All box you will select every student in the list. Clicking on an individual student will select/unselect them. A selected student will be highlighted in blue.
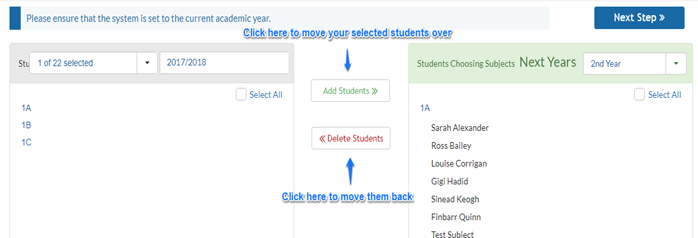
When you have chosen the students to be involved in options, click on the ‘Add Students >>’ button in the centre. This will move your selected students from the left to the right. To move them back click ‘<< Delete Students'.

Important: In this screen, moving students back and forth while you configure the lists is not a problem. However, if you have already entered in preferences in the following screens, their preferences will be lost.
